
I found it easier to just rest the rose on the table and turn..face side down...
They always turn out, everytime!
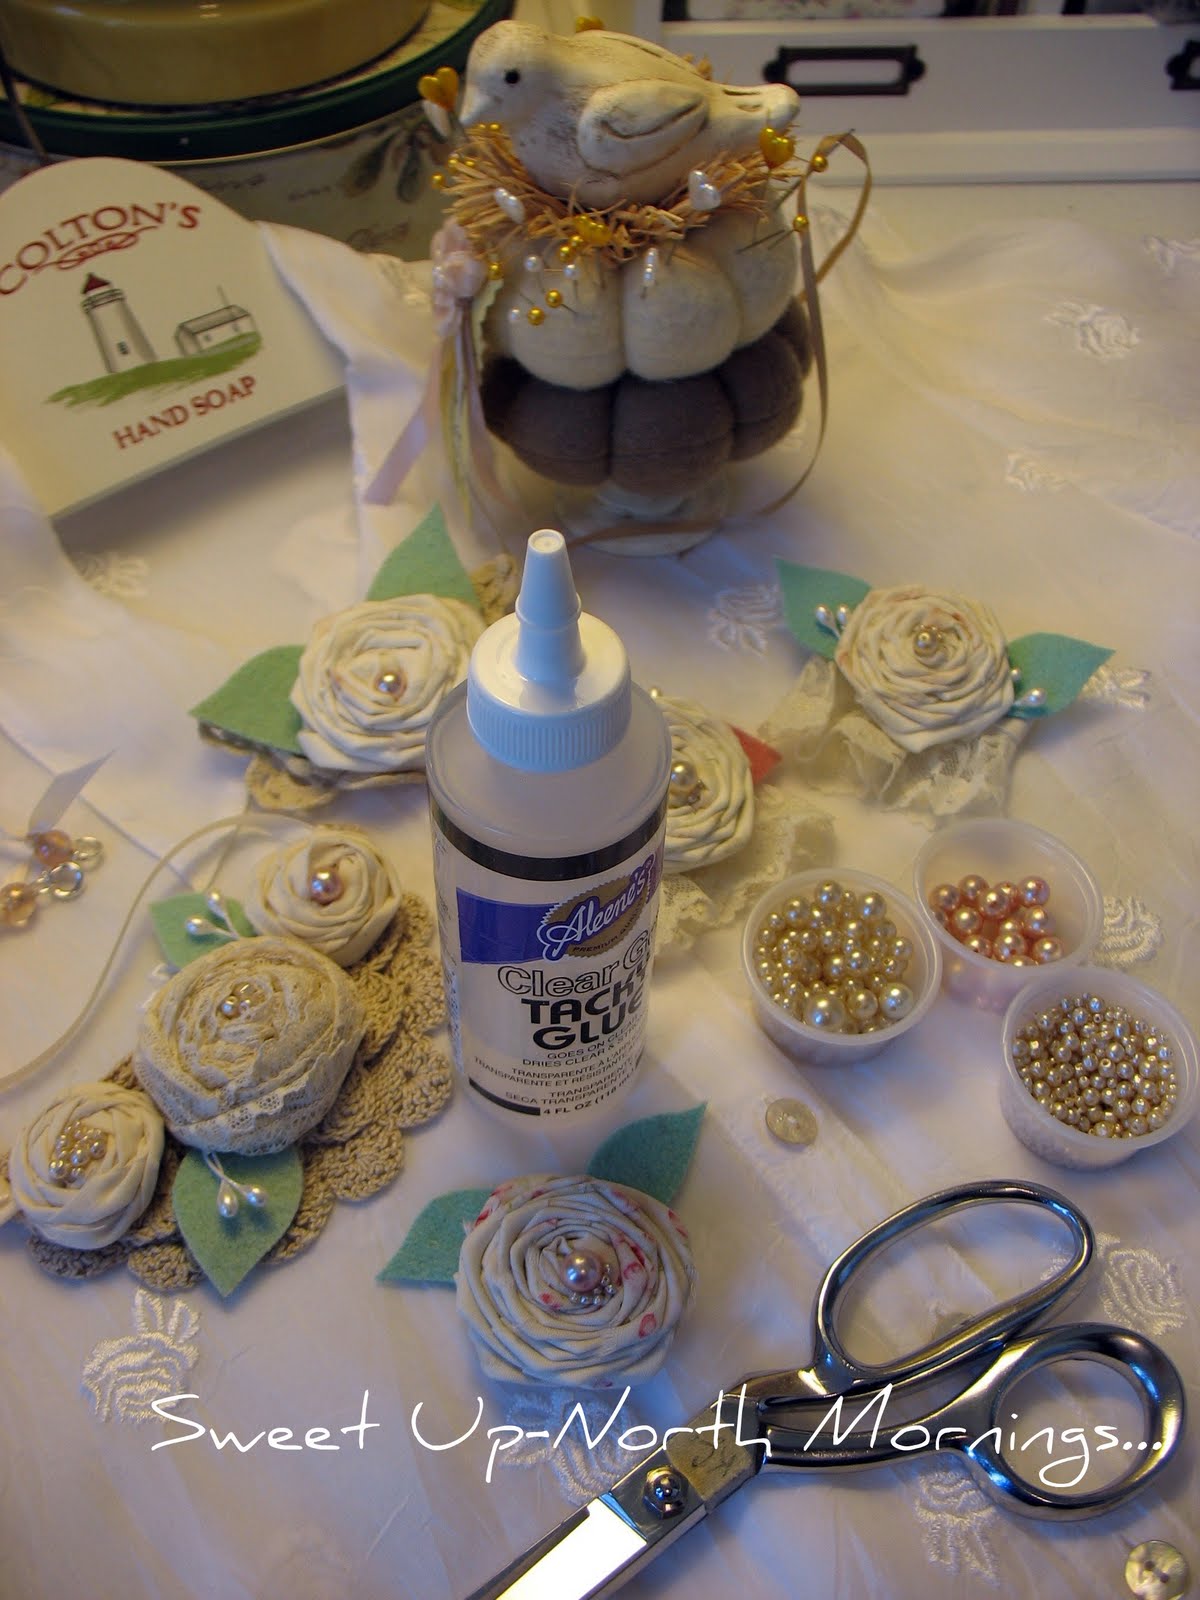
 Add embellishments of your choice!...Pearls, buttons, or simply nothing...
Supplys...
Think I'll add this one to this little dress I just finished for my Grandaughter....

The uses for these little Roses are just as large as your imagination!...

I hope that was helpful...
Would love to hear if you were inspired !
Have a "Rosey" day sweet peeps!
xoxo~Kathy...
eeeeewwww! I LIKE! I'll be making me one, for sure! Thanks!
ReplyDeleteLove the tutorial Kathy and what a beautiful rose for your little girl's dress. It is so lovely. Your photos were great and I need to get some nice fabric to try this out.
ReplyDeleteHugs,
Teacup Lane (Sandy)
Thank you so much for this tutorial. Just great!
ReplyDeleteKelly
Second Hand Chicks
Thanks for sharing how to make these. I've made flower pins for years....crochet ones and some with purchased tiny ribbon roses that I cluster together, but I've never made the fabric ones before.
ReplyDeleteI'm going to go see what is in my fabric stash and make myself one.
~Cindy~
YAY!!!!!!!!!!!!!
ReplyDelete:P Yes, Thanks so much for the great tutorial! I have been trying and trying to make these, and while I like mine enough, they never come out quite like yours! Well... Now I know why! I need to get that Tacky glue- I have been stitching mine, and let me tell you... It's not that easy!
Thanks again, this is getting bookmarked in my ever growing 'More crafts to do' List!!
Those are just so fun and funky. I love the material you chose, too.
ReplyDelete=)
I applaud your wonderful taste..and creativity.
ReplyDeletethe dress is priceless.
You are a darling nana:)
Wowwwwww...................free class!! thanks Kathy...........lovely new banner you have........!!
ReplyDeleteHave a lovely sweet Rosey week !!!
Hugs from me.................Ria
Hi Kathy,
ReplyDeleteWhat a sweet rose! I will have to try my hand at one. Great tutorial and thanks for sharing.
Blessings,
Sandi
Hi Kathy! I just had to come right on over here to see your tutorial!
ReplyDeleteand yes, I am inspired to try one of these roses! there is so much creativity here in blogland that no one magazine can cover all the beautiful and inspiring variety!
well done!
ciao bella
creative carmelina
Just beautiful!
ReplyDeleteAnd I think I could actually do this, thank you, Kathy!
Anne
Great tutorial. I love the roses and the little dress you made is just stunning with the rose. I really do have to try this. Hugs, Marty
ReplyDeleteKathy thank you so very much for such a wonderful tutorial on how you make your sweet beautiful fabric roses. I love the sundress you have made. Your photos of the little ones show how proud you are and how adorable they each are. Happy creating...
ReplyDeleteHi Kathy,
ReplyDeleteI want to thank you for the fabric flower tutorial. I just tried one, the glue is setting now. I made a smaller one than yours,
it is 2" by 1ft. strip. It came out sooo cute!
I want to make a necklace with a few of them of different sizes. When I finish I will post it on my blog!
You're an Angel!!
Hugs,
Susan
Kathy...I think they are just darling and thank you so much for sharing your "how-to" with all of us! I am visualizig one on my jean jacket!~Patti
ReplyDeleteWow! Thanks Kathy! Never in a million years did I think it would be that simple! I have lots of shabby chic roses to plan for the little baby girl on the way! xo m.
ReplyDeleteLove the dress and the roses!!!!!!!!
ReplyDeleteThat turned out really beautiful! I have made roses with ribbon by making angles and then pull the end to make the rose. I really like this one though! Thanks for sharing!!
ReplyDeleteThank you for the tut.!! I can't wait to try it tomorrow. I grew up in McBain, I used to be an Eisenga. I recently got in touch with your very talented daughter, Beth via facebook.
ReplyDeleteThat rose is beautiful, and you made it look so easy! Love it on the dress! Linda
ReplyDeleteGORGEOUS Kathy, just gorgeous.....I love these so much and your instructions are perfect!!!! Thank you so much for sharing sweetie ~ wishing you a wonderful week, hugs and love, Dawn
ReplyDeleteSo lovely! Thank you for sharing this with us. I love making shabby tattered things too.
ReplyDeleteHugs,
Terri
Great tutorial Kathy!! I learned so much! Thanks so much for showing us how to make these lovely roses! xxoo
ReplyDeleteHi Kathy! So glad you stopped by my blog. I LOVE this tutorial. Have been wanting to know how to do these. I love your blog and will continue to follow. Blessings to you!
ReplyDeleteYou make it look so easy.. I just have to give this a try! Thanks so much for showing us how. Wish me luck:)
ReplyDeleteThanks for coming by my new blog.
Blessings
Gwen
Hi Kathy,
ReplyDeleteFirst of all I want to tell you how much I love that little dress. The fabrics are so sweet and the little rose pin is precious.
I love you tutorial, you make it look easy. I usually sew mine but this looks easier and I think I'll try your method.
hugs
Sissie
Hi Kathy,
ReplyDeleteI have made those out of crepe paper before when we were decorating for a baby shower and stuff and have done them and pinned them but never thought to glue them. Great idea. Course, mine were not as fancy as yours they were just simple, but love the idea of the glue. Your grandaughter dress is so pretty and with the rose embellishment I think she is gonna love love love it!!
Thanks for taking the time to do that tutorial.
It was neat, interesting how you tore the fabric as well. Cool!
You have a beautiful week hon,
Blessings Galore, Nellie
Hi Kathy,
ReplyDeleteO.K. now I have to unpack my fabric that I just packed for our move LOL. I really have to try and make a fabric rose. I love them they are just the sweetest ever and it looks adorable on your little grand-daughters dress you made for her...
Wonderful and fun post Kathy!!!
Take care and big hugs to you both,
Elizabeth
Thanks so much for the tutorial! These are really super cute!
ReplyDeleteBrenda
Dear Kathy:
ReplyDeleteThank you for your fabulous tutorial. Easy to understand and will be a joy to try! Now, you need to tell me where you got such a beautiful birdy pincushion!
I really appreciate you visiting Brynwood and leaving your sweet thoughts, my friend. I'll be back again soon to see more of your posts. It's so much fun catching up with you!
xoxo
Donna
Oh, I was very inspired! I just don't know if I can do it. But I'll give it a try. Great tutorial you put together. Pictures are where it's at for me as I usually skip the reading part and figure things out by the picture. Fun post!
ReplyDeleteLOVE LOVE LOVE this!!!! Thanks so much!
ReplyDeleteseptember
Your roses are fabulous. Thanks for giving us all a step by step tutorial! Lovely job!
ReplyDeleteThank you so much for this tutorial, Kathy! I appreciate it. I think your roses are beautiful. You are such a talented lady. Have a great day! Twyla
ReplyDeleteHi Kathy....yes I am inspired. You always create the most lovely things. I always enjoy your many talents.
ReplyDeleteMaryrose
What a great tutorial.... I had fun catching up on your blog. Love the little white table you redid!
ReplyDeleteBlessings~LillySue
Good gracious woman, how have I not known about you before this??? I love your beautiful blog and will be a happy follower...;-) Come say hello in my neck of the woods anytime you like.
ReplyDeleteyour friend,
Janet
Http://theemptynest-janet.blogspot.com/
Hi, Kathy. Thanks for stopping by my blog. I just wanted to tell you that these directions are awesome. Great photos and instructions.
ReplyDeleteKathy, that's gorgeous! Thanks for the tutorial. I'm going to print this post and file it, so I can try making them.
ReplyDelete